


...So we were given this task in the Altschool School of Cloud Engineering to setup an Nginx load balanced application using AWS, having learnt about Ansible, I decided to automate the task using Ansible's IaC capabilities.
Load balancing your applications help you attain high availability/up time. Imagine you were tasked to provision 10+ servers in various availability zones (AZ) using the AWS console, I bet that would be a pain and boring task which can also lead to inconsistencies and human error.
In this article, I will walk you through how we can provision a load balanced application using Ansible which makes it really efficient to provision your infrastructures consistently.
By the end of this article, we'll get the following setup and running with Ansible;
- VPC with 2 public and private subnets
- Security Groups to manage traffic within our VPC
- Internet Gateway
- NAT Gateway
- Two EC2 AMIs running with nginx server
- ALB to balance our requests in the AZs
Architecture Overview
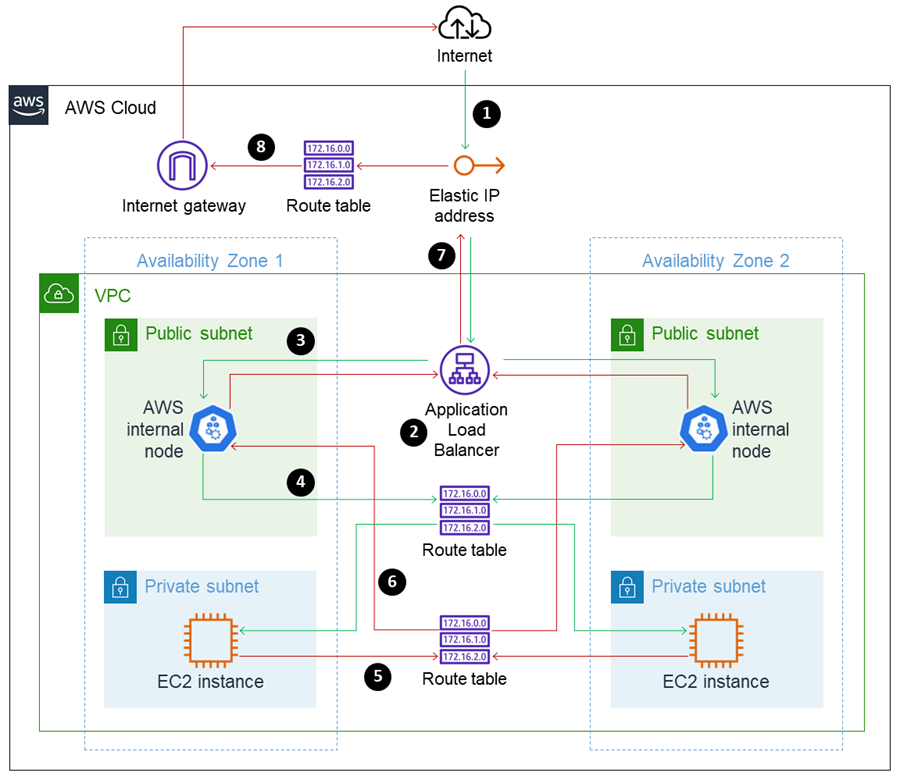
image credit: AWS
Prerequisites:
- AWS CLI
- Boto3 Library
- IAM user role with EC2 & Elastic Load Balancing access (following the principle of least privilege)
- Ansible
- Ansible collection for AWS
ansible-galaxy collection install community.aws - Optional - AWS Vault - you might want to also setup aws-vault for your IAM user role access key and secret key (recommended)
Let's get started;
Create/update your inventory file: hosts.yml
I will be using my local machine as the control node, a bastion host or Ansible tower can suffice.
---
localhost:
  hosts:
    127.0.0.1:
Playbook file: main.yml
---
- name: ansible aws alb
  hosts: localhost
  gather_facts: no
  tasks:
1. AWS VPC: Think of a VPC as your own data centre where you will setup your traditional network and add subnets, but here, everything is virtual and AWS helps you with scaling without much thinkering on your part.
As a private network, we would use a private Classless Interdomain Routing (CIDR) block. As a rule of thumb, let's take note of the AWS rules for creating a best practice VPC;
- CIDR block size must be between /28 & /16 subnet mask.
- The CIDR block must not overlap with any existing CIDR block that's associated with the VPC.
- You cannot increase or decrease the size of an existing CIDR block.
- The first four and last IP addresses are not available for use, this is a very important point to note so you have enough addresses for the instances and resources you deploy.
- Use CIDR blocks from the RFC 1918 ranges.
Using this 10.0.0.0/16 CIDR block, we have enough networks and hosts per network.
N.B: I would only use IPv4 addresses in this article.
We'll use the register to retrieve/reference variables.
    - name: setup altschool vpc.
      amazon.aws.ec2_vpc_net:
        name: Altschool VPC
        cidr_block: 10.0.0.0/16
        region: us-east-1
        tags:
          module: ec2_vpc_net
          this: altschool_vpc
      register: vpc_id
2. SUBNETS FOR OUR VPC: A subnet is a range of IP addresses in your VPC, here, we will create four subnets; 2 public and 2 private. You can leverage this IP Subnet Tool to help you create your subnets.
Public Subnet: This subnet will have a direct route to an internet gateway as in our diagram, this is where we would launch our ALB later on. Make sure to create them in more than one AZs (ex: us-east-1a & us-east-1b) for high availability; this helps your load balancer to keep serving your users from the available zones when one server in an AZ goes down while you bring them back up.
# public subnet 1
    - name: create Public 1A subnet
      amazon.aws.ec2_vpc_subnet:
        state: present
        cidr: 10.0.1.0/24
        region: us-east-1
        az: us-east-1a
        vpc_id: "{{ vpc_id.vpc.id }}"
        tags:
          Name: Public 1A
      register: public_1a
# public subnet 2
    - name: create Public 1B subnet
      amazon.aws.ec2_vpc_subnet:
        state: present
        cidr: 10.0.2.0/24
        region: us-east-1
        az: us-east-1b
        vpc_id: "{{ vpc_id.vpc.id }}"
        tags:
          Name: Public 1B
      register: public_1b
Private Subnet: This subnet does not have a direct route to an internet gateway. Resources in a private subnet require a NAT device/gateway to access the public internet. We'll launch our ec2 instances in this subnet. Make sure to create them in different AZs for high availability.
# private subnet 1
    - name: create Private 1A subnet
      amazon.aws.ec2_vpc_subnet:
        state: present
        cidr: 10.0.3.0/24
        region: us-east-1
        az: us-east-1a
        vpc_id: "{{ vpc_id.vpc.id }}"
        tags:
          Name: Private 1A
      register: private_1a
# private subnet 2
    - name: create Private 1B subnet
      amazon.aws.ec2_vpc_subnet:
        state: present
        cidr: 10.0.4.0/24
        region: us-east-1
        az: us-east-1b
        vpc_id: "{{ vpc_id.vpc.id }}"
        tags:
          Name: Private 1B
      register: private_1b
3. INTERNET GATEWAY: The internate gateway allows communication between our VPC and the internet, here, we need to route internet-bound traffic to the internet gateway from the public subnet where our load balancer sits.
    - name: create internet gateway
      amazon.aws.ec2_vpc_igw:
        vpc_id: "{{ vpc_id.vpc.id }}"
        state: present
        tags:
          Name: Altschool igw
      register: igw_id
4. NAT GATEWAY: We need a NAT device to allow our private ec2 instance access to donwload initial updates and install the neccessary components. You can decide to use a the AWS managed NAT gateway or choose to create your own NAT instance, here I'll be using a NAT gateway. NAT gateways are paid, make sure to review its pricing, also remember to shut it down when done configuring your instances, you can always attach a new NAT gateway later on.
    - name: Create new nat gateway
      amazon.aws.ec2_vpc_nat_gateway:
        state: present
        subnet_id: "{{ public_1a.subnet.id }}"
        if_exist_do_not_create: yes
        release_eip: true
        wait: true
        region: us-east-1
      register: natgw_id
5. ROUTE TABLES: We need to create route tables for the internet gateway and NAT gateway. By default, AWS creates a route table for every VPC.
Internet Gateway Route Table: We create a router to route traffic from anywhere on the internet 0.0.0.0/0 to our internet gateway. This is going to be our main route table because we'll also associate our public subnets to it.
    - name: create internet gateway route table
      amazon.aws.ec2_vpc_route_table:
        vpc_id: "{{ vpc_id.vpc.id }}"
        region: us-east-1
        tags:
          Name: Public Web
        subnets:
          - "{{ public_1a.subnet.id }}"
          - "{{ public_1b.subnet.id }}"
        routes:
          - dest: 0.0.0.0/0
            gateway_id: "{{ igw_id.gateway_id }}"
      register: public_route_table
NAT Gateway Route Table: We also create another route table to route traffic from the internet to our NAT gateway and then associate our private subnets to it.
    - name: create NAT gateway route table
      amazon.aws.ec2_vpc_route_table:
        vpc_id: "{{ vpc_id.vpc.id }}"
        region: us-east-1
        tags:
          Name: Private Web
        subnets:
          - "{{ private_1a.subnet.id }}"
          - "{{ private_1b.subnet.id }}"
        routes:
          - dest: 0.0.0.0/0
            gateway_id: "{{ natgw_id.nat_gateway_id }}"
      register: private_route_table
6. SECURITY GROUPS: These are stateful traffic controllers that determine the traffic allowed to reach a certain resource attached to it. We'll create ALB & Instance security groups.
ALB Security Group: For this, we need to create an inbound rule to allow http traffic on port 80 for our load balancer, we will keep the default outbound rules as we would be deploying a static app.
    - name: create ALB security group
      amazon.aws.ec2_security_group:
        name: alb-sg
        description: allow internet access to ALB
        vpc_id: "{{ vpc_id.vpc.id }}"
        region: us-east-1
        tags:
          Name: Altschool alb sg
        rules:
          - proto: tcp
            ports:
            - 80
            cidr_ip: 0.0.0.0/0
            rule_desc: allow http traffic from anywhere
      register: alb_sg
Instance Security Group: We also create a rule to allow inbound ssh traffic to our local machine IP (optional) and http traffic from the ALB security group.
- name: create private ec2 instance security group
      amazon.aws.ec2_security_group:
        name: altschool-ec2-sg
        description: allow internet-facing ALB access
        vpc_id: "{{ vpc_id.vpc.id }}"
        region: us-east-1
        tags:
          Name: Altschool sg
        rules:
          - proto: tcp
            ports:
            - 22
            # replace the IP with your host machine IP
            cidr_ip: 197.xxx.xx.xx/32
            rule_desc: allow ssh traffic from local machine
          - proto: tcp
            ports:
            - 80
            group_id: "{{ alb_sg.group_id }}"
            rule_desc: allow traffic from ALB security group
      register: ec2_sg
7. TARGET GROUP: We need to create a target group for our load balancer, we'll register our targets later on.
- ensure you already setup ansible community module for this.
    - name: Create a target group with a default health check
      community.aws.elb_target_group:
        name: altschool-tg
        protocol: http
        port: 80
        vpc_id: "{{ vpc_id.vpc.id }}"
        state: present
8. APPLICATION LOAD BALANCER: Go ahead and configure the ALB in the public subnet.
    - name: setup load balancer
      amazon.aws.elb_application_lb:
        name: altschool-alb
        subnets:
          - "{{ public_1a.subnet.id }}"
          - "{{ public_1b.subnet.id }}"
        security_groups:
          - "{{ alb_sg.group_id }}"
        region: us-east-1
        listeners:
          - Protocol: HTTP
            Port: 80
            DefaultActions:
              - Type: forward
                TargetGroupName: altschool-tg
        state: present
      register: altschool_lb
9. EC2 AMIs: We go ahead and launch our ec2 instances using a simple user data script to install Nginx and display the hostname of our individual servers. Here, I used the AWS linux 2 AMI image ami-0b5eea76982371e91 you can use any distro of your choice, be sure to specify them appropriately.
Optional: Import a Key Pair. Before launching an EC2 instance, it is recommended to create a key pair or attach an existing key, this will enable you access your private instances later using their private IPs. Here I'll choose to import a key pair with the default name of each OS. In this case, we'll use ec2-user since we'll be using Amazon Linux 2 AMI. Make sure to create one beforehand and name it appropriately (eg: ec2-user) from the AWS console.
# change the user-name path accordingly
- name: import ec2 key pair
      amazon.aws.ec2_key:
        name: ec2-user
        key_material: "{{ lookup('file', '/home/user-name/.ssh/id_rsa.pub') }}"
      tags:
        - ec2_create
        - ec2_keypair
Write this script in a file and specify the location in the lookup file user_data.sh:
#!/bin/bash
yum update -y
amazon-linux-extras install nginx1.12
systemctl start nginx
systemctl enable nginx
echo "<h1>This server has the IP: $(hostname -f)</h1>" > /usr/share/nginx/html/index.html
    - name: create server1 ec2 instance with user data
      amazon.aws.ec2_instance:
        name: server1
        region: us-east-1
        key_name: ec2-user
        instance_type: t2.micro
        security_group: "{{ ec2_sg.group_id }}"
        vpc_subnet_id: "{{ private_1a.subnet.id }}"
        network:
          assign_public_ip: false
          delete_on_termination: true
        image_id: ami-0b5eea76982371e91
        user_data: "{{ lookup('file', 'user_data.sh') }}"
      tags:
        - ec2_create
      register: server1
Repeat same for server 2
    - name: create server2 ec2 instance with user data
      amazon.aws.ec2_instance:
        name: server2
        region: us-east-1
        key_name: ec2-user
        instance_type: t2.micro
        security_group: "{{ ec2_sg.group_id }}"
        vpc_subnet_id: "{{ private_1b.subnet.id }}"
        network:
          assign_public_ip: false
          delete_on_termination: true
        image_id: ami-0b5eea76982371e91
        user_data: "{{ lookup('file', 'user_data.sh') }}"
      tags:
        - ec2_create
      register: server2
10. ATTACH INSTANCES TO TARGET GROUP Finally, we now attach our private instances to our load balancer target group.
# Register server1 & 2 instance targets to our target group
    - name: Register targets
      community.aws.elb_target:
        target_group_name: altschool-tg
        target_id:
          - "{{ server1.instances[0].instance_id }}"
          - "{{ server2.instances[0].instance_id }}"
        state: present
Checkout the final playbook.
Go ahead and run the playbook.
N.B >> Using the Ansible --check flag fails on some modules like amazon.aws.ec2_vpc_net etc, doesn't mean they are wrong)
You should have similar results if there are no errors :)

Please leave a comment if you've got better ways to implement this, I'll be in the comment section. Ka emesia.